Friday, February 26, 2010

Bourbon Glazed Pork Tenderloin

Like a lot of things I make, I like to think that I have made them so many times that I have perfected them.

This pork is based off of Bourbon Glazed Salmon. I tweaked the recipe to have enough of the marinade to reserve some to use as a sauce. I also marinate the pork much longer than the salmon. Using the technique from another recipe, I tried cooking the pork in the marinade, vs. broiling it and the marinade has a more prounounced flavor. I also think the pork is jucier.  Pulling it from the oven at 155 degrees and letting it sit for 10 minutes before slicing also helps with that.

I also learned a small trick when using the reserved marinade. Since it does have bourbon in it and the alcohol can have that raw taste, bring it to a boil to take the edge off.

This pork is easy enough for a weeknight, but also tastes special enough to serve to company. You can do the bulk of the work before your guests arrive and then pop it in the oven to cook when the time is right.


Bourbon-Glazed Pork Tenderloin


2 cups packed brown sugar
3/4 cup bourbon
1/2 cup low-sodium soy sauce
1/4 cup fresh lime juice
4 teaspoons grated peeled fresh ginger
1 teaspoon salt
1/2 teaspoon freshly ground black pepper
4 garlic cloves, crushed
2 - 2 1/2 pounds pork tenderloin
Combine the first 8 ingredients in a large zip-top plastic bag;  reserve about 1 cup of marinade. Refrigerate. Add pork tenderloins to zip top bag. Seal bag, and marinate in refrigerator 2 -8 hours, turning bag occasionally.

Preheat oven to 450 degrees.

Empty ziploc bag contents into a 11x3 baking dish, marinade and all, and bake for about 25 minutes, or until an instant read thermometer reads 155 degrees. Let pork sit about 10 minutes before removing from baking dish and slicing.

Take reserved marinade and heat in a sauce pan until it starts to boil. Serve pork with a drizzle of sauce.
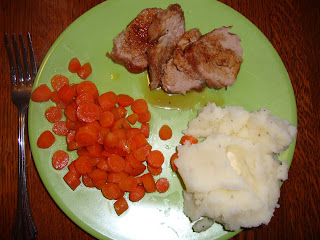
Wednesday, February 24, 2010

Candy Carrot Coins

C & H both love carrots. They like them raw, roasted and cooked. These carrots have been on our rotation for years. They taste good and most importantly, the boys eat them right up. Actually, we all do.

I make these carrots quite often because they are always well recieved and they seem to make the dinner seem more special. And the boys gobble them up, did I say that already?

Using a bag of baby carrots and a microwave steam bag these come together in a snap. The longest prep step is slicing the carrots and keeping little hands from swiping the sliced carrots.


Candy Carrot Coins

Family Fun Fast Family Dinners


1 pound carrots
1 tablespoon butter
2 tablespoons brown sugar
1 teaspoon water


Peel, slice carrots. Cook until tender ( cover with water, microwave 6-7 minutes covered or steam etc.)


In small frying pan, melt the butter, sugar and water, and cook for 1 minute. Add carrot coins and toss to coat with the brown-sugar mixture. Cook on low for 3-4 minutes, or until the carrots are thoroughly glazed.


Makes 4 servings

Monday, February 22, 2010

Lemony Chicken Piccata

It seems like everyone has a recipe or two that is their go-to when it is rolling on dinner time and have nothing planned. That is what Lemony Chicken Piccata is for us. It is easy and good. Most importantly it is pretty quick in the grand scheme of things.

I was watching Ten Dollar Dinners with Melissa D'Arabian and got a great tip that makes this chicken even easier. Instead of pounding the chicken flat, which makes the chicken even in thickness, Melissa cut a thick chicken breast in half width-wise. I tried it the next time I made this recipe and it really did make the prep faster. It isn't as even as the pounding with a mallet, but when you are trying to get dinner on the table, it is fine. It is easier when the chicken breasts are slightly frozen.

I also used my trick of mixing the dredge ingredients (flour/salt/pepper/garlic powder) in a ziploc bag and adding the chicken. The clean up is so much faster and easier. Again, on a weeknight, it is all about getting good food on the table in a reasonable amount of time.

A fresh lemon is a requirement for this dish. No ifs, ands, or buts.

I apologize that the picture isn't the most appetizing. I am working on that.


Lemony Chicken Piccata

1/2 cup all-purpose flour
1/2 teaspoon salt
1/4 teaspoon pepper
1/4 teaspoon garlic powder
1 1/2 pounds boneless, skinless chicken breasts
1 tablespoon canola oil
1 lemon
1/2 teaspoon honey

Combine flour, salt, pepper and garlic powder in a ziploc bag.

Slice the chicken breasts in half, width-wise. You can also put the chicken breast between 2 sheets of wax paper or plastic wrap and pound them with a meat mallet until they are about half of their original thickness. If you pound, you will need to cut the chicken in half as well.

Heat the oil in a skillet over medium-high heat.  Add the chicken to the flour mixture in the ziploc bag.  Shake off the excess flour and put in the skillet. Cook the chicken until lightly browned, about 2-3 minutes.  Flip the chicken and saute until lightly browned and cooked through, another 2-3 minutes. 

When the chicken is cooked, remove to a plate. Depending on how many chicken pieces you have, you may have to do 2 batches. You may also have to add a little more oil to the pan.

Reduce the heat to low, and add the butter to melt. Once melted, remove from heat and add the honey and the juice of the lemon. Add any juices from the platter of chicken. Stir to combine and pour the sauce over the chicken. Serve.

Wednesday, February 17, 2010

Popovers

I can't remember why I tried these popovers in the first place. It was most likely because I had never made or tried them. This recipe was also in a new cookbook and when I get a new cookbook, I like to try something right away. Whatever the reason, I am glad I did. We all love these popovers. They are buttery and crispy on the outside and soft on the inside. I do not like eggs in pretty much any form but I love the slightly eggy taste inside. Popovers are quite similar to eclairs or Pâte à choux.

The boys love to help when making these. They can do pretty much do all of it by themselves. They can crack the eggs, pour the milk and measure the salt and flour. They also love buttering the muffin tin. *HINT* When letting children crack eggs, have them crack each egg on the bottom of a bowl. Any mess is contained and if you need to pick out a piece of shell, it is much easier. Pour each egg into the mixing bowl after it is cracked.

Along the way, I have learned a couple things. Most importantly, Eggland's Best eggs do not work for whatever reason. I tried a couple times and each time ended up with a tin of hockey pucks. The popovers didn't rise. Secondly, using a blender makes this really easy. Add the eggs and milk to a blender. Mix. Add the remaining ingredients and blend until smooth and well blended. This makes for easy mixing and pouring.

The oven needs to be preheated, hot and ready to go when the popovers are put in to bake. When baking, DO NOT open the oven until the time is up.

We love these served with some butter and homemade strawberry jam.


Perfect Popovers
Mollie Katzen

2 Tablespoons butter, melted
2 eggs
1 cup milk
1 cup flour
1/4 teaspoon salt


Preheat oven to 375°F.

Brush the inside of 12 muffin cups with melted butter.

Break eggs into a large mixing bowl. Add milk and beat well. Add flour and salt; whisk in until well blended. Pour batter into each muffin cup; cups should be about half to two-thirds full.

Bake 30 minutes. Remove muffins from pan and prick with a fork to let steam escape. Serve immediately.

Monday, February 15, 2010

The BEST Chocolate Cake

By now you know, I am all about tried-and-true recipes. Don't get me wrong, I love trying out new recipes like anyone else, but when I find one that becomes a tried-and-true, JACKPOT!


We had my parents over for my Mom's birthday and when I asked what flavor cake she would like, she said chocolate. Easy enough. Well, once I started going through my cookbooks, it became a little overwhelming. I like a challenge, but I had some time constraints and wouldn't be able to do something too time consuming,


I have read/ heard about the Black Magic Cake from Hershey's and once I saw the recipe I knew it would be the one I would try. Then I read the recipe from the back of the container of cocoa and the Perfectly Chocolate Cake was really similar. I decided to combine the two recipes and it is a winner.


This cake is very easy to make. The ingredients are found in most pantries. You don't need to melt, sift, or alternately pour. It can be done in one bowl and all you need is a hand mixer. Outside of measuring, this cake is just as fast and 100 times better than any box mix.


The frosting really sets off the cake and takes it to another level.


You have to try this cake, it is rich, moist, chocolately and DELICIOUS!


Molli's Chocolate Cake


Cake
2 cups white sugar
1 3/4 cups all-purpose flour
3/4 cup cocoa powder
1 1/2 teaspoons baking powder
1 1/2 teaspoons baking soda
1 teaspoon salt
2 eggs
1 cup buttermilk or sour milk*
1/2 cup vegetable oil
2 teaspoons vanilla extract
1 cup black coffee


Frosting
1/2 cup butter, room temperature
2/3 cup cocoa powder
3 cups powdered sugar
1/3 cup milk
1 teaspoon vanilla extract


Heat oven to 350 F. Grease and flour two 9-inch round baking pans.


Stir together sugar, flour, cocoa, baking powder, baking soda and salt in large bowl. Add eggs, buttermilk, coffee oil and vanilla; beat on medium speed of mixer 2 minutes. (Batter will be thin). Pour batter into prepared pans.


Bake 30 to 35 minutes or until wooden pick inserted in center comes out clean. Cool 10 minutes; remove from pans to wire racks. Cool completely.
 
Frosting: Cream butter. Stir in cocoa. Mix in vanilla. Alternately add powdered sugar and milk, beating to spreading consistency. Add small amount additional milk, if needed.


*sour milk - 1 tablespoon white vinegar plus milk to equal 1 cup

Friday, February 12, 2010

Banana Bread

Every once in a while, you come across a dud recipe. This time it came to me in the form of Banana Bread. The recipe sounded good. It came from a  Penzey's catalog and the woman who sent it in raved about how good it is. But then again, if I were to submit my recipe to a catalog/magazine, I would rave too. It was a little different than other banana breads I usually make because it calls for buttermilk, which I happened to have in my refrigerator. I will be honest, it made the recipe more appealing.

It's not that the recipe is bad, but it is not worth repeating. We ate the bread, and the boys seemed to like it. We've had better is all. Ray and I thought it was lacking in the banana flavor. With most quick breads, it is better the next day. This bread was actually worse!

The recipe that follows is for a tried and true Banana Bread. It is adapted from Cooking Light. I have made it both ways in the little loaf pans and the big loaf. All depends on what you are in the mood for. The recipe is simple and the bread has a lot of flavor.


Mom's Banana Bread 
Adapted from Cooking Light


  • 1  cup  sugar

    • 1/4  cup  butter, softened
  • 1 2/3  cups  mashed ripe banana (about 3 bananas)
  • 1/4  cup  skim milk
  • 1/4  cup  low-fat sour cream
  • 2  large egg whites
  • 2  cups  all-purpose flour
  • 1  teaspoon  baking soda
  • 1/2  teaspoon  salt
  • Cooking spray


Preheat oven to 350°.
Combine sugar and butter in a bowl; beat at medium speed of a mixer until well-blended. Add banana, milk, sour cream, and egg whites; beat well, and set aside.
Combine flour, baking soda, and salt; stir well. Add dry ingredients to creamed mixture, beating until blended.
Spoon batter into 4 (5 x 2 1/2-inch) miniature loaf pans coated with cooking spray. Bake at 350° for 45 minutes or until a wooden pick inserted in center comes out clean. Let cool in pans 10 minutes on a wire rack; remove from pans. Let cool completely on wire racks.
To make one 9-inch loaf, spoon batter into a 9 x 5-inch loaf pan coated with cooking spray; bake at 350º for 1 hour and 10 minutes. 


Wednesday, February 10, 2010

Roasted Kale


This recipe was posted on a cooking board I read. We've had Kale once or twice and it isn't our favorite. We like Beet Greens and Swiss Chard MUCH better. After reading everyone rave about how good this was, I thought, what the heck.

It was very easy to make. C and H had fun using the salad spinner to dry the Kale. That was really the most labor intensive part of the whole deal. It is a matter of tossing the Kale pieces with olive oil then a sprinkle of salt. Easy peasy. We all thought it was good. Ray and I thought it was better than the boys did. 

The texture was crispy and the Kale almost melts in your mouth. 

I used the curly variety, and would use a flat variety i.e. Dinosaur Kale next time. It would be easier to dry and I think it would be a little crispier.

This is a good way to try a new vegetable if you haven't tried Kale, or are not a fan.


Roasted Kale

I bunch Kale
Olive Oil
Salt

Tear up kale and remove the stems 

Toss with a tablespoon of oil and a sprinkle of salt. Place on a baking rack set over a sheet pan and bake at 250°F for about 25 minutes, tossing about halfway through.


Don't oversalt.

Monday, February 8, 2010

Pumpkin Muffins/ Bread

Ah, Snack Day. A big thing for a kindergartener. C knew he wanted pumpkin bread a LONG time ago. It is his turn about every 6-8 weeks. The only rules are that the snack be healthy and have no peanuts - funny how some parents can't seem to remember this! I didn't think his teacher would really appreciate me sending in a few loaves of bread, so I decided muffins, portioned and transporable, and told C to pick which muffin liner he wanted for his pumpkin muffins. Scooby Doo for those interested. I made a double batch so H also brought some into his preschool class for snack.

This bread is so good and so easy. I tweaked the recipe, substituting half of the AP flour with whole wheat just a little to make it a little healthier. I also added ground ginger. I didn't have any buttermilk and used sour milk instead. I made the sour milk before mixing any of the other ingredients. It is 1 tablespoon white vinegar into a 1 cup measure and the remainder of the cup milk. So, for this recipe 1 tablespoon plus 2 teaspoons white vinegar and milk to the 1 2/3 cup. By the time I got to the part of adding the buttermilk, the milk was soured enough. Having 2 helpers also slows things down, in a good way of course. 

Especially when using the wheat flour, this bread is better the next day. Of course, it is good when cooled too. 

Depending on how much you fill the muffin liners, you will get between 24 and 30. I filled mine about 2/3 full and got 30. I forgot to take a picture of the ones I sent to school, so these were the ugly ones I kept home for us to eat. The boys loved having a few extra to eat with breakfast the next couple of mornings too. They really are delicious!


Pumpkin Muffins
Adapted from Martha Stewart's Baking Handbook

1 1/2 cups all-purpose flour
1 1/2 cups white whole wheat flour OR whole wheat flour
2 teaspoons baking powder
2 teaspoons baking soda
2 1/2 teaspoons ground cinnamon
1/2 teaspoon nutmeg 
1/2 teaspoon ground ginger
1/4 teaspoon ground allspice
1/4 teaspoons salt
2 cups canned pumpkin purée
1 cup granulated sugar
1 cup packed dark-brown sugar
4 large eggs
1/4 cup vegetable oil
1 2/3 cup buttermilk 
    Preheat the oven to 375ºF and put liners or grease two muffin tins. Whisk together the flour, baking powder and soda, spices, and salt. In the bowl of an electric mixer fitted with the paddle, combine the pumpkin and sugars. Mix until well combined, and then add the eggs and oil. Mix until incorporated, scraping down the sides as needed. With the mixer on low, add the flour in two batches, alternating with the buttermilk, and mix until just combined. 
    Bake 19-20 minutes or until a tester comes out clean.Transfer pans to wire racks to cool for 10 minutes. Remove muffins from pan and let cool completely.
    For Bread: Coat two 8.5″ × 4.5″ loaf pans with butter. Bake for about an hour, at 350º rotating the pans halfway through. A cake tester should come out clean. Cool the pans on a rack for ten minutes, remove the loaves from the pans, and cool completely.

    Friday, February 5, 2010

    Honey Oat Bread

    For whatever reason, I remembered this bread. I used to make it pretty often, then I forgot about it. I am glad I thought about it again. The boys, C and H, have gone crazy for it. They eat it as sandwiches for lunch and with peanut butter and honey for breakfast. It is very good toasted. That is how I have been eating it for breakfast.

    Instead of making two loaves, I split the dough and made a loaf and bread and rolls. The boys also loved those. It probably helped that I whipped up a quick batch of honey butter ( 1/4 salted butter and 2-3 tablespoons honey).

    This bread is a little more involved but it is oh so good. It is soft with a nice texture. The honey  gives the bread a slight sweetness. The oats, a tender chew.


    Take the time and try this bread.


    Honey Oat Bread
    Adapted from The Ultimate Peanut Butter Cookbook

    2 1/2 cups boiling water
    1 cup rolled oats
    1 packet yeast or 2 1/4 teaspoons
    1/3 cup warm water
    2 tablespoons honey
    2 tablespoons peanut oil
    2 teaspoons salt
    6 to 7 cups all-purpose flour

    Pour boiling water over the oats in a large bowl and set aside to soak until all the water has been absorbed and the mixture is lukearm, stirring occasionally.

    About 5 minutes before getting started with the bread, add the yeast to the warm water in a small bowl. Stir to combine and let sit about 3 minutes, until frothy.

    Stir the honey, oil, and 2 teaspoons salt into the softened oats, then stir in the dissolved yeast mixture.

    Using either a stand mixer with a dough hook or by hand, stir in 4 1/2 cups flour. Mix or knead (by hand)additional flour until a pliable but firm dough forms, one that is sticky but is stiffer than most white breads. The amount of flour will depend on the humidity and the brand of flour. Knead for 10 minutes until the dough is smooth and elastic.

    Grease a large bowl, gather the dough into a ball, place in the bowl and turn the dough so it is coater. Cover loosely and let rise until doubled in bulk, about 1 1/2 hours.

    Gently deflate the dough. Divide in half and shape into a loaf or rolls. Place the loaf or rolls into a greased pan. Cover and let rise until doubled in bulk, about an hour.

    Once doubled, bake loaves at 350 degrees for about 45 minutes. Bake rolls at 375 degrees, 15-20 minutes.
    Let loaves cool completely before slicing.

    Wednesday, February 3, 2010

    Sesame Stir-Fried Broccoli

    I mentioned before that broccoli is a vegetable the boys go crazy for, so I am always on the lookout for new recipes. I found a winner with this one. The boys gobbled this up and asked for seconds! Ray and I enjoyed it too.

    It has asian flavors with garlic, ginger and sesame. The toasted sesame seeds give it that extra layer of flavor that sets it off. Make sure you really reduce the sauce to intensify the flavors. It is easy to just say good enough because it smells so good, but you will be rewarded with your patience.

    This reheated well and will be on our rotation.

    At this time, I will mention a pet-peave of mine. Yes, I am lazy, so 9 times out of 10, I google the recipe to see if someone has posted it. I found this recipe, but the poster did not give credit where credit is due. They changed the name of the recipe and the oils called for and called it their own. This recipe belongs to Jack Bishop, from his cookbook, Vegetables Every Day.


    Sesame Stir-Fried Broccoli

    Vegetables Every Day

    1 tablespoon sesame seeds
    1/2 cup chicken stock (or vegetable stock)
    1 tablespoon soy sauce
    1 tablespoon toasted sesame oil
    1 1/4 peanut oil
    1 pound broccoli florets, rinsed, patted dry, cut into bite-sized pieces
    2 cloves of garlic, minced
    1 tablespoon minced fresh ginger

    Toast the sesame seeds by first heating a small, stick-free sauté pan on medium heat. Add the sesame seeds and jiggle the pan so they spread out in a single layer. Let them cook until lightly browned, stirring occasionally, about 3-5 minutes. Do not walk away from them while cooking, as once they start to brown they can easily burn. Once lightly toasted remove from heat and put into a small bowl, set aside.


    Mix the stock, soy sauce, and toasted sesame oil together in a small bowl, set aside.


    Heat 1 tablespoon of peanut oil in a large, covered sauté pan on medium high heat. Add the broccoli florets, stir to coat the florets with the oil, Sauté for about a minute. Clear a space in the middle of the broccoli and add the ginger and garlic. Add a little more oil to the ginger and garlic (about a teaspoon) and sauté for half a minute, stirring just the garlic and ginger, until fragrant. Then stir the garlic and ginger in with the broccoli.


    Add the chicken (or vegetable) stock mixture to the pan. Bring to a simmer, reduce the heat and cover. Let cook for 2-3 minutes, until broccoli is still firm, but can be pierced with a fork. Remove from heat. Remove broccoli with a slotted spoon to a bowl. Return pan to heat, increase heat to high and boil down the liquid until just a couple tablespoons remain. Turn off heat, return broccoli to the pan, add the toasted sesame seeds, toss with the liquid. Put into a serving bowl.

    Serves 4.

    Monday, February 1, 2010

    Pork Bulgogi

    A friend was talking about Bulgogi and the next day, this came in my inbox from Everyday Food. Perfect timing! I have made something similar before so I knew we would like this.

    I made a small error when making this. C does not like anything with too much spice. I don't know what I was thinking. Well, I do. I read the recipe before cooking and saw that the marinade was thrown out, so I thought no big deal, the crushed red pepper will be tossed out. WRONG! It stuck to the meat. I got most of it off, but after one bite the boys had a fit. We ended up rinsing C's off. H takes the heat better and ate it once the red pepper was off. I know for next time to cook their portion separate and to add the crushed red pepper to ours.

    I doubled the recipe because I cannot remember ever buying a pork tenderloin that didn't wasn't at least two pounds.When I sliced the meat, it was partially frozen, and it sliced much easier. I sliced it very thin. I also did use the toasted sesame seeds and it really added a nice flavor to the dish. I served it over rice.

    I am not a big leftovers person, but this was so good that Ray and I had it for leftovers.


    Pork Bulgogi
    Adapted from Everyday Food

    6 small garlic cloves, minced
    1/4 cup soy sauce, low sodium
    2 tablespoons sugar
    2 tablespoons sesame oil
    2 teaspoons crushed red pepper
    2 teaspoons ginger, freshly grated
    1/4 teaspoon ground pepper
    1 pound pork tenderloin, very thinly sliced crosswise
    1 large onion, cut into 12 wedges
    1 tablespoon olive oil
    Toasted sesame seeds (optional)

    In a medium bowl, combine garlic cloves, soy sauce, sugar, sesame oil, crushed red pepper, ginger, and ground pepper.


    Add pork tenderloin and onion wedges; marinate at least 10 minutes. I marinated about an hour.


    In a 12-inch skillet, heat olive oil over medium heat. In batches, brown pork and onion, 3 to 5 minutes per batch. Discard marinade.


    Return all pork and onion to skillet; cook until warm. Garnish with toasted sesame seeds, if desired.